Rockin’ The “Boat”

Steamboat that is.  What were you thinking?  After an incredibly insane month or two of holiday cheer in the real world, we took a week-long, much-deserved, much appreciated trip to the amazing Steamboat Springs, CO.

Photo 1

The place is known in the ski and board circles for one thing: Copious amounts of light fluffy “champagne” TM (Seriously… its trademarked by Steamboat Resort) powder.  Plus, with our Rocky Mountain Super Passes, Jess and I had 6 days worth of lift tickets already in the bag.

We stayed in an amazing cabin about 5 minutes – but another world – away from downtown Steamboat Springs.

Photo 4_WEB

We planned for everything: what amazing runs we would take to get to the best powder filled aspen glades, what lifts would get us there fastest, what time to get up to get first tracks, where to eat breakfast on the go to get there early… the ONE thing we didn’t plan for: ABSOLUTELY NO SNOW!  Not a flake fell until the day we left.

Outdoors_130111_SteamboatTrip_0259WEB

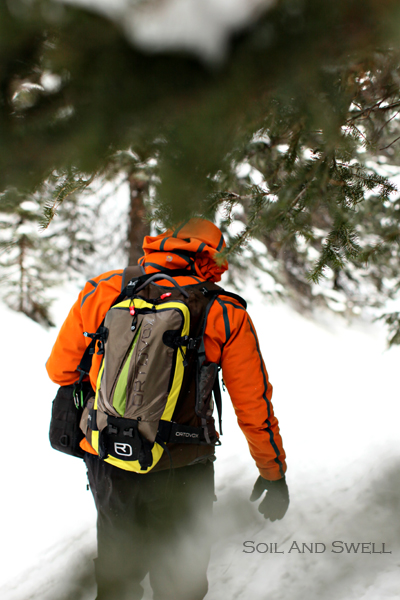
That should have been a complete disaster – right?  Actually… it worked in our favor.  Instead of jostling every other powder-hound-cowboy to load up into a cramped humid gondola, we took our sweet time and hit some of the most fun backcountry lines we have ever experienced.

Outdoors_130111_SteamboatTrip_0208_WEB

Just goes to show, when life hands you lemons… chuck ’em and go splitboarding.  (Oh… or go hit the hot springs!)

DCIM100GOPRO

Oh, and before you go, here are a few MUST do activities and tips while spending time in Steamboat:

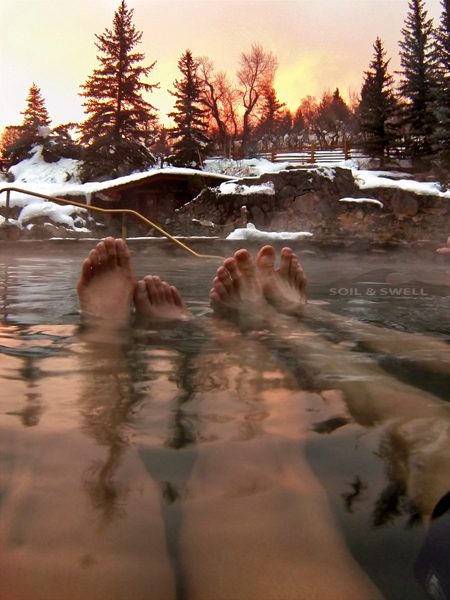
  1. Strawberry Park Hot Springs – Pretty much the number one reason we came here according to Jess, and it was so worth it.  Go during a snow storm – the contrast is so amazing between the warm pools and the cold snowy atmosphere.  Photo 2_WEB
  2. Rabbit Ears Pass/Buffalo Pass – Backcountry – Rabbit Ears is super mellow and a great place for beginner splitboard/skiers to have a good time.  Head to Walton Peak or you can find some fun lower commitment stuff off of the Fox Curve trail too.
  3. Off The Beaten Path Coffee/Book Shop – Nice place to relax and have some coffee on a down day plus they have wifi so you can reconnect with the world.
  4. Perry Mansfield Cabins – Awesome place to stay about 5 minutes outside of downtown Steamboat.  No internet, no TV, no stress!  Super quiet and perfect for unwinding.
  5. Lil’ House Biscuits Just get the plain biscuit: SO tasty.
  6. Johnny B. Good’s Diner For Breakfast – Cool vibe and good breakfastOutdoors_130111_SteamboatTrip_0287_WEB
  7. Steamboat Smokehouse BBQ Joint – Have the best appetizer: “Burnt Ends” are just the best crispy part of a brisket and are very flavorful. Outdoors_130111_SteamboatTrip_0446_WEB
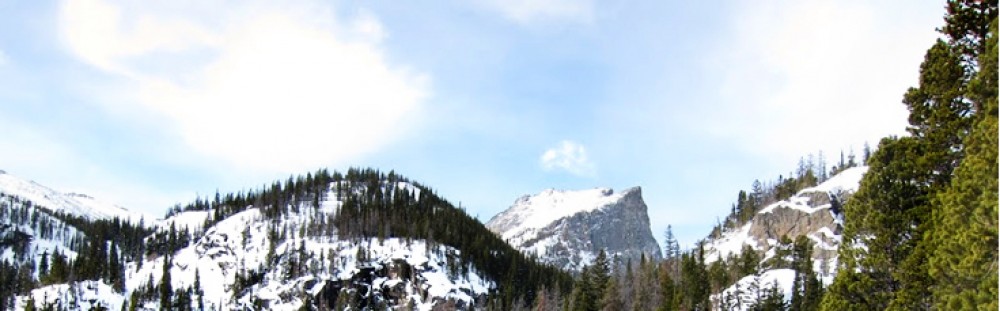
  8. Steamboat Resort Itself – duh? We didn’t have great snow conditions while we were there but the trees off of the Storm Peak Express and Sundown looked like they would be epic on a pow day.
  9. Bear Grill at Steamboat Resort – According to Jess they have the “Best hot chocolate she has ever tasted” – No joke, she was super impressed.  DCIM100GOPRO

How To: Waterproof Your Own Topo Maps

There you are – out backpacking, biking or touring in “sub-optimal” (read WET) weather and need to pull out the map for a quick direction check.  If you are using a non-waterproofed map it’s pretty much game over at this point.  Soggy maps and folding do not mix, and before long your trusty lifeline back to civilization is deteriorating before your eyes. As a backpacker, splitboarder, backcountry skier or mountain biker, if you haven’t been there yet, you will.

A ton of maps come in durable, waterproof versions, and National Geographic makes “Adventure Paper” to print your own, but there are still many maps that are not.  Key among these are the standard USGS topographic maps that are key to anyone who ventures off the beaten path.

The solution: DIY waterproofing.  Here’s how to do it:

130104_MapSealMaterialsWEB

MATERIALS NEEDED:

TIME REQUIRED: About 1 hour to apply, 72 hours for full drying

DIFFICULTY: Super Easy

COST: $6-12 depending on size of sealer product purchased (plus an ~$8 map)

PROCEDURE:

The first step is to rig up a hanging apparatus for your map.  Mine consists of two twist ties tied to two paper clamps tied to the chandelier.  Get creative and work with what you’ve got.

Layout your map on a flat surface, gently stir the map seal and quickly brush on a thin coat using the provided applicator (some versions have a foam brush which is much easier to get an even coat). Make sure you cover the map evenly.  It can help to have a light shining at an angle to easier see where you have and have not applied the sealer.

130104_MapSealBottle

After applying a coat, hang the map up using the clips and ties or clothes pins for about 5 minutes.  Once tacky, repeat the procedure above on the SAME side making two coats. Again, hang to dry, this time for about 30 minutes.

After the first side is dry, repeat the process with the back side by applying one coat, hanging for 5 minutes and then applying a second coat.  Finally, hang the map making sure it does not contact any other surfaces or fold over on itself (it will stick) for at least 72 hours before using it.

130104_MapSealHangingWEB

Once complete, not only will your map be waterproof, but much more durable and foldable.  Now go get out there and use it.

130105_MapSeal_Beading01

Ortovox Haute Route Backpack Gear Review

121217_PackReviewActionBack01_WEB

All in all, the 35L Ortovox Haute Route pack, with its versatile equipment carry options and great detailed features, is a solid choice for the day touring backcountry skier or splitboarder.

This review is from a splitboarders perspective – which means that this pack has been put through its paces.  We splitboarders use the heck out of our packs.  Every lap we are taking it on and off, taking things in and out, strapping on and off poles, placing our board in ride mode and/or ski mode, so it has to hold up and it has to be versatile.

FIRST IMPRESSIONS:
My main first impression of this pack was not good… I told Jess: “this thing just looks too small for even a day pack.”  Other than that, this pack is well put together with rugged reinforced nylon throughout.  The pack is clean looking too, with waterproof zippers and sturdy zipper pulls.  Overall, it’s a nice looking pack but just does not LOOK like it would fit everything I would need for a day of backcountry splitboard touring.

130104_PackReviewStaticAvyPocket01WEB

FEATURES:
The Haute Route line from Ortovox comes in 3 sizes including a women’s pack, a 35L and 45L option.  I have the 35L version and it really has everything you could ask for in a ski/ride pack*

  • Dedicated – easy to access avalanche rescue gear compartment
  • Board and ski carry modes
  • Gear and ice axe loops
  • Handy hip belt pockets
  • Hydration Bladder sleeve and hose routing
  • Rear Access to the main compartment
  • Helmet attachment system

121217_PackRevewActionSide01_WEB

THE FINAL WORD:
Overall, the Haute Route has impressed me in use.  It looks small and it feels small on your back but it has held everything I have needed for a day tour.  The helmet attachment and ski and board carry options are pretty sweet too.  The only negative so far is that there is ONLY rear access to the main compartment which makes it hard to get to gear when you just want to sling it off one shoulder.  Also the rear access zipper has a tendency to catch and can be a pain to open up- especially with gloves on.

All in all, the 35L Haute Route pack, with its versatile equipment carry options and great detailed features, is a solid choice for the day touring skiier or splitboarder.

*Detailed specs can be found at ortovox’s website.

Breaking Trails and Breaking In

When your season starts as horribly as ours, you tend to go a while without getting out and splitboarding.  What also happens, is you end up getting a lot of new gear without getting a chance to try it out as you get it.  That was the case for us as we finally had enough snow here in the Front Range to go get on it and break in some of our gear.

We didn’t have much time and weren’t in the mood for much of a drive so we went to check out one of the closer local spots up past Nederland – Caribou.

As usual, a little windy up there.

"Nice" day for a split tour

“Nice” day for a split tour

Jess getting out on the Voile Mojo RX that we picked up in the off season, and me on my DIY splitty.

The quiver

The quiver

Felt really good just to get out on some snow again.  The frustration of this early season is unreal, and the best way to cure it, I’ve found, is to get out there when the going gets good.  (BTW, pretty obvious that we haven’t been out much since I FORGOT OUR FRICKIN POLES!)

Awww, snow.

Awww, snow.

Jess is sporting a whole new setup including the Voile MojoRX split, Voile Lightrail bindings, new G3 High Traction skins and Black Diamond Covert Avalung pack.  That means: lots of GEAR REVIEWS on the way.

Testing out the new Voile and G3's

Testing out the new Voile and G3’s

So nice to be able to actually dig in the snow.  What did I find?  About 1-2ft of soft slab on top of rotten depth hoar, yup, not too good.

Cocaine... so much cocaine!

Cocaine… so much cocaine!

AND, some new gear of my own to test out including the Ortovox Haute Route pack, some Arcteryx Theta AR bibs and a new Lowe Pro camera bag setup for backcountry photo shoots.

Satisfaction!

Satisfaction!

Skimo a ‘No-Go’

Skimo, short for ski mountaineering, combines the sports of Telemark, Alpine and backcountry skiing with that of mountaineering.

A Ski Mountaineering race is a timed event that follows an established trail through challenging winter alpine terrain while passing through a series of checkpoints. Racers climb and descend under their own power using backcountry skiing equipment and techniques.
Basically, it’s like an adventure race on snowy mountains with slightly different gear.  I don’t know about you, but for someone who loves trail running and adventure racing in the warmer seasons this seems like a perfect venue for the winter.
The problem: I DON’T SKI!  I splitboard, which is really just another way of accomplishing the same task… but with style!  
I had no idea this was a problem until I recently tried to sign up for one of these races.  Jess and I went to the Teva Mountain Games last year and ran the night snowshoe race with our dog and really wanted to do the recreational course of the skimo event this year.

Rogue getting warmed up for her race last year

Rogue getting warmed up for her race last year

There was nothing on the website that said I could not use a splitboard, but just to be sure, I emailed the organizer.  This is the response I got:

Ryan,

We’re saying no to splitboards for a couple of reasons:  The biggest is we don’t yet have an appropriate course for it. Most skimo courses (and Vail in particular) are low angle which makes for slow skinning on a splitboard due to the width and nylon skins. (most skimo skis are 64-72 mm underfoot and use mohair). And I’d like to see a board course have more direct (fun) descents as well. When we do it I want it to be a shorter, more fun on the down type course.  Also, splitboards don’t fit in the skin tracks on the narrow sections.   It’s on the list to do a good splitboard course but it’s no for this winter.
Um… I’m not so sure about really any of that actually mattering, in fact a lot of the freeskier types that participate have some pretty darn wide skis and use the exact same skin material I do.  I’ve since replied, but it almost reminds me of the same garbage that you get when you ask skiers at Alta why they don’t allow snowboarders.
As far as I can tell, skimo racers just seem to be a bunch of skinny ski, spandex wearing dopers that can barely ski back down the mountain anyway, so maybe we’re not missing out, but then again, maybe they could use a little “refreshment” from us splitboard types.

First Day Out: Jones Pass/Butler Gulch

Watching the snow fly this last week, I had determined that I HAD to go get out and at least see it, feel it, touch it (yeah, it’s like that).  I decided to check out a new area and decided on the Jones Pass/Butler Gulch area.  Not knowing how much snow was really out there, I optimistically packed my splitboard in the car hoping against hope that there would be enough to slide on.
Well, pulling up to the trailhead was not promising:

Not too promising out of the gate at the Jones Pass TH

Almost immediately after leaving the trailhead though, things started to gradually improve into a skinable 4-6 inches on the trail.

Skinning in, things are improving

After climbing to about 11,000′ things got a bit deaper and I actually made a few (very cautious) light turns.

Splitboard and Tracks – Like Pees and Carrots

All in all, I was not optimistic that I would even be able to skin up there, but it turns out it was much better than I thought.  About 12-18″ more up there and it should open up quite a bit.

Snow + Me = Smiles

Early Season Snow… blessing or curse?

I get pretty excited when temps start to drop, leaves start to fall and talk of snowflakes picks up.  After all, this is one of the prettiest times of the year in the high country:

Dogs enjoying the fall colors.. oh wait, they’re color blind

I used to spend hours watching satellite loops, anticipating when snow would start falling on my fave Mammoth Mountain.  That attitude didn’t change when I moved here to Colorado, but should it?

Last season I took my AIARE Level I avalanche class and I have shifted my focus to the backcountry.  In terms of avalanche safety and backcountry snowboarding, early season snow is typically a BAD thing… WHAT!!!!  “How can that be?” you ask.  Well, let’s talk snow science:

Snow is good, but snow doesn’t just fall from the sky lay on the ground and stay there.  It is constantly changing (snow geeks call this metamorphism).  Those little flakes that you see in a snowstorm are great, they typically bond well together and make for a pretty good snow layer, but what tends to happen early season is that they begin to “facet.” These facets do not bond well to each other or other layers and become little ball bearings for avalanches to slide on.

Facets!

If you’ve been in the game long enough, you’ve heard the term facets before, but what causes them and why is it so bad with an early season snowpack?

1.  Facets are caused by temperature differences between lower and upper layers of the snowpack (geek speak = temperature gradient).   Check out this site for a cool video and a ton more info.

Temperature Gradients that cause facets.

2.  These gradients are especially bad with a thin snowpack (like early season).

3.  Facets forming from this temperature gradient in the lower snowpack is called depth hoar.  It sticks around and causes problems for a long time through the season (persistent) and is one of the major causes of injury/fatality causing avalanches

“Never trust a depth hoar snowpack, no matter how deep you bury her”
-Unknown Smart Dude

Overall, for resort riders, let it snow, let it snow, let it snow!  For the backcountry types out there, let’s be a little more patient, if it’s going to snow, let it snow hard and keep snowing for months, otherwise lets hold off until it’s ready to dump.
So, in conclusion:  Am I going to stop obsessing over early season snow? Probably not.  Am I going to pay attention to what it does to the avalanche hazard in the backcountry… hell yes and so should you.

Split Decision: DIY Splitboard Part I

Oh the splitboard… an answer for all those years of slogging up snow covered hillsides in clunky snowshoes with a 5′ board strapped to your back, I liken the invention to a miraculous gift from heaven (or Ullr if you’re into that sort of thing).

Snowshoe/Snowboarding RMNP

Owning a splitboard has been a dream of mine since probably 2001 where I got my first taste of backcountry snowboarding in the Mammoth Lakes, CA area. Joining the military and being stationed in Mississippi didn’t help my cause and it isn’t until now, living in Colorado, that the dream finally looks to become reality.

This is less of a step by step DIY and more of a documentation of this momentous occasion. There are some awesome How-To videos on the Voile site and YouTube that walk you through the whole thing if you are interested.

So the first (pre) step to the whole process is deciding whether or not you want to buy a factory split or go for it and split your own. The cost of splitboards is dropping drastically and you can get a sweet one for like $450-500 now. With that in mind, if you don’t like to do somewhat lengthy and moderately challenging home projects, just buy one. If you are like me, and really just get stoked at the idea of making your own splitboard for the fun of it then hop on the DIY train, buy a kit and let’s get started.

Step 1 is getting a board that will be good to split. Check out splitboard.com forums for a bunch of other folks boards that they have split and like (or dislike) to get an idea. When I was asking about mine, the best piece of info I got was “If you don’t like it before splitting it, you’ll hate it after.” For me, I had a great board in mind. I have had this Burton Custom 169 for about 10 years that was mostly just sitting there since I have upgraded and it became kinda obsolete.

The board - pre-split

Once you have a good board to split, you have to get the kit.  The most popular of which is the Voile Split Decision (Saw your old board) kit.  Make sure you get this one and not the universal split kit since that is for an already split board.

Love how it's called the "Saw your old board" kit

Lots of stuff in there.

Once you have the board and the kit, it’s time to get down to business.  Next, take some blue painters tape and run it down the middle of your board where you will be cutting, on top and on bottom.

Make sure you measure almost every two inches along the length of your board and check it a zillion times.  This mark is crucial.  Make sure you use a very straight edge like a piece of manufactured wood or metal to ensure your line is straight, if this is jacked then there is no going back, so get it right and take your time on this step.  It’s also a good idea to put your bindings on and mark out their general location/angles for future reference.

Looks good to me

Alright, now that that is done, you need to set yourself up a good work station.  Something firm that you can clamp the board to so it won’t budge during the cutting.  Also, make sure there is a nice little gap for where the saw blade will pass through so you don’t have to stop and move anything or cut your saw horses in half.

Nice and stable

Now you should be set up for success.  Now comes the most stressful part: actually cutting your frickin board in half!  If you are like me, you have a bit of an attachments to your old boards, I mean they are quiet, loyal little friends that you’ve counted on for days of fun sliding down snow covered mountains.  So, say your goodbyes to your old solid board and just remember that it will all be for the best, I mean once you’re done you can use this guy to get you to stashes it would never have seen.

"Scalpel!"

The most common way to cut a splitboard is with a circular saw with a carbide tipped blade attached, I have one, but I just couldn’t bring myself to use it.  I have not been too successful with past circular saw projects and you really have one shot at it.  I decided to go the Amish way and use a variety of hand saws to get it split. Either way, just commit and do it as smoothly and continuously as possible.

No going back now.

My burton board has the 3D inserts to cut through which made it a total pain in the ass, but I think the saw could have handled it pretty easily.  Going back, I think I would have just manned up and used the skil saw with similar or better results.

1 is now 2

Now the stressful part is over, but the fun is just beginning.  Now you get to drill all kinds of holes in your board!